Showing posts with label JNCIS. Show all posts

Tuesday, November 22, 2011

Juniper - Firewall Filter


1.Firewall filter là gì?

Khái niệm firewall là một khái niệm quen thuộc. Khi nói về firewall, người ta thường nghĩ tới các thiết bị có khả năng chặn được các cuộc "tấn công” từ các tác nhân bên ngoài vào một hệ thống mạng. Đối với các hãng sản xuất khác, người ta thường dùng khái niệm Access Control List, còn đối với Juniper thì khái niệm tương tự là Firewall Filter.

Firewall filter được đưa ra dưới dạng một stateless firewall, chủ yếu được sử dụng để kiểm soát thông tin đi ra/vào các thiết bị sử dụng Junos. Ta có thể sử dụng Firewall filter để hạn chế một số thông tin không cần thiết, hoặc cũng có thể dùng để kiểm soát, theo dõi tình trạng bảo mật.

Firewall filter sẽ kiếm soát thông tin bằng cách xem xét các thông số về layer 3, layer 4 trong gói tin. Dựa vào những rules đã được cấu hình vào lưu trong database, sẽ xem xét và áp dụng các hành động thực thi với gói tin.

Có thể tạm so sánh Firewall filter của Junos với ACL của IOS như sau:


2.Cấu tạo của một Firewall filter

Hình ảnh so sánh ACL của IOS và Firewall filter của Junos bên trên cũng đã cho ta một cái nhìn phần nào về firewall filter. Firewall filter có cấu tạo cũng khá giống với routing policy, bao gồm các term, trong term có các vế from để định nghĩa điều kiện lọc, và vế then để áp dụng hành động cho các chủ thể được lọc.


3. Các điều kiện để lọc
Có rất nhiều điều kiện để firewall filter lọc, chủ yếu là các thông số về layer 3 và layer 4 của gói tin.
Firewall filter có thể sử dụng rất nhiều các điều kiện khác nhau cho việc lọc. Tương tự như routing policy, term trong firewall filter cũng sử dụng vế from để định nghĩa các điều kiện lọc:

4.Các hành động xảy ra

Khi một packet đã được firewall filter lọc, nó sẽ cho ra 2 kết quả: ĐÚNG hoặc SAI. Nếu như kết quả ĐÚNG - tức là thành phần của packet khớp với nội dung của vế from- thì packet sẽ phải chấp nhận một hành động được thực thi do firewall filter đưa ra. Hành động này được định nghĩa trong vế then của firewall filter. Nếu như kết quả SAI thì sẽ bỏ qua.

Lưu ý rằng, đối với firewall filter cũng có một hành động mặc định được định nghĩa đó là nếu như không khớp với nội dung của firewall filter thì packet sẽ bị block.

Các hành động mà firewall filter đưa ra được chia làm 3 mục chính:
-Terminating actions:
  • -accept
  • -reject
  • -discard

-Flow control:
  • -next term

-Action modifiers:
  • -count.log. và syslog
  • -forwarding-class và loss-priority
  • -Policer

Trong đó, terminating actions sẽ chấm dứt hoạt động lọc packet của firewall filter.Hai hoạt động reject và discard là như nhau, đều loại bỏ packet nhưng với reject thì sẽ gửi một thông điệp ICMP về nơi gửi packet. Còn discard thì sẽ lặng lẽ gạt bỏ packet mà không hề thông báo cho bên gửi.

Flow control sẽ điều khiển hướng đi tiếp theo của packet trong việc lọc. Giá trị next term nói cho firewall filter biết rằng, nếu như packet khớp với vế from thì sẽ đưa packet đến term tiếp theo để lọc.

Action modifier được sử dụng cho Class-of-Service tham khảo.

5.Xây dựng một Firewall filter hoàn chỉnh

Firewall filter được định nghĩa dưới mode [edit firewall]. Junos hỗ trợ đa giao thức nên cần phải lựa chọn các kiểu giao thức phù hợp. Ở đây, ta sẽ xây dựng firewall filter trên nền giao thức IPv4 trong family
IPv4 được Junos đưa vào trong inet family, IPv6 thì được đưa vào trong inet6. Ta sẽ xem xét xây dựng firewall filter tại inet family.

Muốn xây dựng một firewall filter trước hết cần phải hiểu rõ các yêu cầu đề ra. Xây dựng firewall filter cũng tương tự như routing-policy, trong firewall filter cũng bao gồm các term. Term được tạo nên từ 2 vế from và then.

Ví dụ: cấm một subnet truy cập tới một subnet khác.
Với ví dụ trên thì restrict-access là tên của firewall filter. Filter này có một term là term1. Nội dung của term đó là: mọi truy cập từ subnet 10.0.0.0/24 đến subnet 11.0.0.0/24 sẽ bị reject.

6.Sử dụng firewall filter

Sau khi đã xây dựng được một firewall filter thì ta sẽ áp dụng filter này cho router. Mục đích của ta là điều khiển luồng lưu lượng ra vào router nên sẽ áp đặt filter cho các interfaces. Khi áp đặt filter cho các interfaces, ta cần chú ý vào hướng lưu thông ra/vào của packet.

Các input firewall filter sẽ điều khiển luồng traffic đi vào router, output firewall filter sẽ điều khiển luồng traffic đi ra khỏi router.

Ngoài ra, ta cũng có thể áp dụng firewall filter với interface loopback để kiểm soát các traffic đi vào hệ thống.

Như vậy, firewall filter sẽ được áp dụng cho interface.

Với ví dụ trên, ta sẽ áp dụng restrict-access cho interface em1 để lọc luồng packet đi vào (input) router.


Sunday, October 30, 2011

[Juniper] Video configuring OSPF on Junos OS

1.Single-area (backbone area)
2.Multiarea


Open Shortest Path First – OSPF


1.Introduction to OSPF

OSPF is an IGP that routes packets within a single AS or domain.

OSPF is a link-state routing protocol and uses link-state advertisements (LSAs) to describe about network topology. Each router gerenates LSAs describe about the network it sees and floods the LSAs throughout the network. At the end, each router has a link-state database (LSDB) that describes about the same topology.

Once the router complete knows the network topology, it runs the SPF (based on Djiktra algorithm) calculation to determine the shortest path to each destination. The calculation results a pair of destination/next-hop that are placed into routing table. This calculation is performed independently on each router.

OSPF runs directly over IP, using IP protocol port 89. It does not use a transport layer protocol such as TCP or UDP.

Each router has a router ID that distinguishes a router with the rest. This router ID is unique. Router ID is a 32-bit number written in dotted decimal notation that looks like IP address. Router ID is typically a lo0 address.

OSPF devides each AS into one or more segments called areas. Each area is a set of networks and hosts that are administrative grouped together.

To exchange information between areas, OSPF uses area border routers (ABRs) which are connected to two or more areas.

ABRs run a separate SPF calculation and maintain a separate link-state database for each area to which they connected. ABRs summarize link-state information from one area before passing to the next, which increase the overall stability for network.

On each multiaccess network, OSPF elects a designated router (DR) that establishes the adjacencies with all router in network. DR election based on the priority which is a number between 0 and 255. DR is a router with the highest priority number. If two routers with equally priority number, the one with lower router ID is selected. It also has a backup designated router (BDR).

OSPF defines some types of area. The core of an OSPF network is the backbone area, which is area 0 (0.0.0.0). All the ABRs attached to area 0.

2.Terminologies

2.1.Link state advertisements – LSAs

Each router maintains a database called link-state database (LSDB), containing the lastest received LSAs. A separate LSDB is maintained for each area connected to the router.

2.1.1. LSA operation

Each LSA is numbered with a sequence number and a timer is run to age out old LSAs. By default, it is 30 minutes.

When a LSA received, it is compared with LSDB. If it is new, it is added to the LSDB and SPF algorithm is run.

If it is from a router ID that is already in the database. The sequence number is compared and older LSAs are discarded. If it is a new LSA, it is incorporated into LSDB and SPF algorithm in run. If it is an older LSA, the newer LSA will be sent back to the one which sent the old LSA.

OSPF sequence number is 32 bits. This sequence number is changed whenever:
-LSA changes because a route is added or deleted
-The LSA ages out. (LSA updates are flooded every 30 minutes, even if nothing happens)

2.1.2. LSA types

OSPF uses different types of LSAs to advertise different types of routes, such as external or internal routing domain.

 2.2.OSPF Operation

OSPF uses several differents type of packets to establishe neighboring and maintains the routing information.

2.2.1.OSPF packets

OSPF uses 5 packet types. It does not use TCP or UDP for transmitting. It runs directly over IP port 89 using an IP header. 5 packet types:

-Hello: identifies neighbors and serves as a keepalive
-Link State request (LSR): request for a Link state update (LSU). Contains the type of LSU request and the ID of router requesting it.
-Database Description (DBD): A summary of LSDB, including RID and sequence of LSA in the LSDB
-Link state update (LSU) : contains a full LSA entry. An LSA includes topology information. One LSU can contain multiple LSAs.
-Link state acknowledgement (LSAck) : Acknowledges all the OSPF packets (except Hellos).

OSPF traffic is multicass to either of two addresses: 224.0.0.5 for all OSPF routers and 224.0.0.6 for OSPF Drs.

2.2.2.OSPF Neighbor relationships

OSPF routers send periodic multicast packet to introduce themselves to other router on link. They become neighbors when they see their own router ID number included in the neighbor field of the Hello from another router. And two routers must be in a same subnet for a neighbor relationship to be performed.

Certain parameters in Hello packet must match for two routers to become neighbors. They include:
-Hello/dead timers
-Area ID
-Authentication type and password (if set)
-stub area flag

OSPF routers can be neighbors without being adjacent. Only adjacent neighbors exchange routing updates and synchronize their databases. On a point-to-point network, the adjacent is established directly when they can communicate. On multiaccess link, OSPF routers establishe adjacent with DR and BDR

Hello also serves as keepalives. A neighbor is considered lost if no Hello packets received within four Hello periods (dead timer). The default Hello/dead timers:
-10 seconds/40 seconds for LAN and point-to-point interfaces
-30 seconds/120 seconds for nonbroadcast multiaccess interfaces.

2.2.3.Establishing neighbors and exchanging routes

The process to establishe the neighbors and route exchange between two routers:

Step1: Down state: OSPF process not yet started, no Hellos sent

Step2: Init state: router sends Hello packets out all OSPF interfaces

Step3: Two-way state: routers receive Hellos from another router that contains its own router ID in neighbor list. All other required elements match, so routers can become neighbors.
When step3 ends, the neighbors are established. The following steps below refer to the exchanging routes.

Step4: Exstart state: If router become adjacent (exchang routes), they determines which one starts the exchange process. In this case, which router with higher router ID will start the process.

Step5: Exchange state: routers exchange the DBDs that describe the local databases.

Step6: Loading state: Each router compares the DBD received to the local contents. It then sends the LSR for missing or outdated LSAs. Each LSR will be responded with a LSU. Each LSU is acknowledged.

Step7: Full state: the LSDB has been synchronized with the adjacent neighbor.


3.Configuring OSPF
3.1. Backbone/single area (area 0)

In this section, I will introduce how to configure OSPF in single-area (area 0). 

Using this topology to illustrate:

Configurations:
=====
R1:
=====
cuong@Jun1# show protocols
ospf {
area 0.0.0.0 {
interface lo0.0;
interface em1.0;
interface em2.0;
}
}

[edit]

==
R2
==
cuong@Jun2# show protocols
ospf {
area 0.0.0.0 {
interface lo0.0;
interface em1.0;
interface em2.0;
}
}

==
R3
==

cuong@Jun3# show protocols
ospf {
area 0.0.0.0 {
interface lo0.0;
interface em1.0;
interface em2.0;
}
}

Using “show ospf route” to determine the ospf routes

cuong@Jun1> show ospf route
Topology default Route Table:

Prefix Path Route NH Metric NextHop Nexthop
Type Type Type Interface Address/LSP
192.168.2.1 Intra Router IP 1 em1.0 10.0.0.6
192.168.3.1 Intra Router IP 1 em2.0 11.0.0.6
10.0.0.0/24 Intra Network IP 1 em1.0
11.0.0.0/24 Intra Network IP 1 em2.0
12.0.0.0/24 Intra Network IP 2 em1.0 10.0.0.6
em2.0 11.0.0.6
192.168.1.0/24 Intra Network IP 0 lo0.0
192.168.1.1/32 Intra Network IP 0 lo0.0
192.168.2.0/24 Intra Network IP 1 em1.0 10.0.0.6
192.168.2.1/32 Intra Network IP 1 em1.0 10.0.0.6
192.168.3.0/24 Intra Network IP 1 em2.0 11.0.0.6
192.168.3.1/32 Intra Network IP 1 em2.0 11.0.0.6

To determine which routes that router has learned from OSPF, check the unicast routing table:

cuong@Jun1> show route protocol ospf table inet.0

inet.0: 14 destinations, 14 routes (14 active, 0 holddown, 0 hidden)
+ = Active Route, - = Last Active, * = Both

12.0.0.0/24 *[OSPF/10] 00:21:54, metric 2
> to 10.0.0.6 via em1.0
to 11.0.0.6 via em2.0
192.168.2.0/24 *[OSPF/10] 00:22:46, metric 1
> to 10.0.0.6 via em1.0
192.168.2.1/32 *[OSPF/10] 00:22:46, metric 1
> to 10.0.0.6 via em1.0
192.168.3.0/24 *[OSPF/10] 00:21:54, metric 1
> to 11.0.0.6 via em2.0
192.168.3.1/32 *[OSPF/10] 00:21:54, metric 1
> to 11.0.0.6 via em2.0
224.0.0.5/32 *[OSPF/10] 00:50:42, metric 1
MultiRecv


3.2.Configuring authentication

Authentication is required if you want to prevent the spoofing in neighbor establish process.

==
R1
==
[edit]
cuong@Jun1# show protocols ospf area 0.0.0.0
interface lo0.0;
interface em1.0 {
authentication {
md5 1 key "$9$H.fz9A0hSe36SevW-dk.P"; ## SECRET-DATA
}
}
interface em2.0 {
authentication {
md5 1 key "$9$H.fz9A0hSe36SevW-dk.P"; ## SECRET-DATA
}
}
==
R2
==
[edit protocols ospf area 0.0.0.0]
cuong@Jun2# show
interface lo0.0;
interface em1.0 {
authentication {
md5 1 key "$9$xnD-b2ZUH5Qn4aQn/CB17-V"; ## SECRET-DATA
}
}
interface em2.0 {
authentication {
md5 1 key "$9$oJZDk5Qnp0I.P0IEcvMaZU"; ## SECRET-DATA
}
}

==
R3
==
[edit protocols ospf area 0.0.0.0]
cuong@Jun3# show
interface lo0.0;
interface em1.0 {
authentication {
md5 1 key "$9$hD7yeWNdsJGiLxGik.zFcyl"; ## SECRET-DATA
}
}
interface em2.0 {
authentication {
md5 1 key "$9$rNkKWxbs4Di.Ndi.P56/lKM"; ## SECRET-DATA
}
}


Wednesday, October 26, 2011

Overviews of Routing Information Protocol – RIP

1.Overview of RIP

 RIP is a standard protocol, but in this post, i want to introduce some knowledges relate to Junos OS

 RIP is a dynamic routing protocol operates within a Routing Domain (IGP). It uses the distance vector algorithm to determine the best route to a destination. The distance is measured in hops, which is a number of router that a packet must pass to reach the destination. The best route is the route with the lowest of hops. In routing table, RIP maintains two informations:

  • IP address of the destination network
  • and the hop count (metric) to that destination. 


 RIP v1 routers exchange their routing information by broadcasting RIP route information every 30 minutes. RIP uses UDP packets for all transactions with port number 520

 2.Routing loops in RIP 

 A problem of the most dynamic routing protocol is routing loop that provides the incorrect routing information. RIP uses two methods to control this problem:
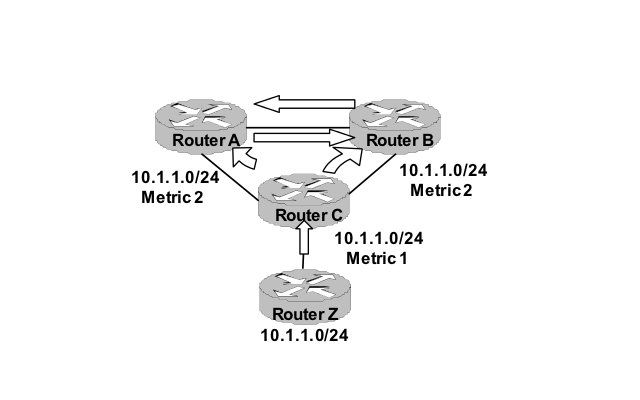
 -Split horizon: when a device receives the route advertisement on an interface, it will not readvertise back that information on the earlier interface.

In the figure above, Router Z advertises route 10.1.1.0/24 to router C and increases 1 in the metric. At this time, router C knows that the metric to reach to 10.1.1.0 is 1. And router C does not advertise this information back to router Z since it received from router Z. And so on, router A and B receive information from router C and increase the metric by 1 and again, do not advertise back to router C.

-Poison reverse: when a RIP device knows a route is no longer connected or reachable, it will advertises that route with an infinite value of metric (16). With this information, each RIP device treats that route is unreachable and never advertise information about that route.

Junos software default supports all above functions.

3.Limitations of RIP

-RIP can be used only in a small network. Because the infinite of hops are 16.
-RIPv1 only uses classful routing. It can not handle the subnet and mask informations
-RIPv1 only uses plain-text password authentication which can be easily sniffed in the insecured network.

4.RIPv2

RIPv2 was developed to increase the security in RIP. It supports CIDR and MD5 authentication. The limitation of 15 hops was remained.

By default, Junos RIP only listens to RIP updates. The router does not advertise the updates until you tell it to do. This is done by setting up the routing policy.

5.Configuring RIP on Junos OS

I use Junos Olive running on VMware to emulate in this guide


5.1.Basic RIP configuration

Diagram:


Configuration on each router:

[edit protocols rip]
cuong@Jun1# show
group rip-group { <- define a rip group 
export rip-policy; <- a routing policy to advertise RIP information
neighbor em1.0; <- interfaces take part in the routing
neighbor lo0.0;
}
// routing policy allows rip advertises information

[edit policy-options]
cuong@Jun1# show 
policy-statement rip-group {
    from protocol [ rip direct ]; <- all rip/direct routes
    then accept; <-- all routes after from statement are allowed
}


[edit protocols rip]
cuong@Jun2# show
group rip-group {
export rip-policy;
neighbor em1.0;
neighbor em2.0;
}

[edit protocols rip]
cuong@Jun3# show
group rip-group {
export rip-policy;
neighbor em1.0;
neighbor lo0.0;
}


Results in each router:

cuong@Jun1> show route protocol rip

inet.0: 9 destinations, 10 routes (9 active, 0 holddown, 0 hidden)
+ = Active Route, - = Last Active, * = Both

11.0.0.0/24 *[RIP/100] 00:06:53, metric 2, tag 0
> to 10.0.0.6 via em1.0
172.16.1.0/24 *[RIP/100] 00:06:02, metric 3, tag 0
> to 10.0.0.6 via em1.0
192.168.128.0/24 [RIP/100] 00:06:53, metric 2, tag 0
> to 10.0.0.6 via em1.0
224.0.0.9/32 *[RIP/100] 00:07:43, metric 1
MultiRecv
--
cuong@Jun2> show route protocol rip

inet.0: 9 destinations, 10 routes (9 active, 0 holddown, 0 hidden)
+ = Active Route, - = Last Active, * = Both

172.16.1.0/24 *[RIP/100] 00:06:26, metric 2, tag 0
> to 11.0.0.6 via em2.0
192.168.2.0/24 *[RIP/100] 00:08:01, metric 2, tag 0
> to 10.0.0.5 via em1.0
192.168.128.0/24 [RIP/100] 00:08:01, metric 2, tag 0
to 10.0.0.5 via em1.0
> to 11.0.0.6 via em2.0
224.0.0.9/32 *[RIP/100] 00:07:17, metric 1
MultiRecv

--
cuong@Jun3> show route protocol rip

inet.0: 9 destinations, 10 routes (9 active, 0 holddown, 0 hidden)
+ = Active Route, - = Last Active, * = Both

10.0.0.0/24 *[RIP/100] 00:07:36, metric 2, tag 0
> to 11.0.0.5 via em1.0
192.168.2.0/24 *[RIP/100] 00:08:23, metric 3, tag 0
> to 11.0.0.5 via em1.0
192.168.128.0/24 [RIP/100] 00:07:36, metric 2, tag 0
> to 11.0.0.5 via em1.0
224.0.0.9/32 *[RIP/100] 00:06:52, metric 1
MultiRecv

Testing routes

cuong@Jun1> ping 172.16.1.1
PING 172.16.1.1 (172.16.1.1): 56 data bytes
64 bytes from 172.16.1.1: icmp_seq=0 ttl=63 time=0.598 ms
64 bytes from 172.16.1.1: icmp_seq=1 ttl=63 time=1.002 ms
64 bytes from 172.16.1.1: icmp_seq=2 ttl=63 time=1.017 ms
^C
--- 172.16.1.1 ping statistics ---
3 packets transmitted, 3 packets received, 0% packet loss
round-trip min/avg/max/stddev = 0.598/0.872/1.017/0.194 ms


5.2.Enabling authentication

Using two commands to set authentication on RIP routers

[edit protocols rip]
set authentication-type md5 <-- md5 is a type of authentication, it encrypts the plain-text password

[edit protocols rip]
cuong@Jun3# set authentication-key juniper <-- juniper is a key (password), used for all RIP routers in network.

Configuration on each router:

cuong@Jun1# set rip authentication-type md5

[edit protocols]
cuong@Jun1# set rip authentication-key juniper

[edit protocols]
cuong@Jun1# show
rip {
authentication-type md5;
authentication-key "$9$R2AcrvxNboJDWLJDikTQEcy"; ## SECRET-DATA
group rip-group {
export rip-policy;
neighbor em1.0;
neighbor lo0.0;
}
}

--
cuong@Jun2# set authentication-type md5

[edit protocols rip]
cuong@Jun2# set authentication-key juniper

[edit protocols rip]
cuong@Jun2# show
authentication-type md5;
authentication-key "$9$fQ390BEevLApvLxNY25QF"; ## SECRET-DATA
group rip-group {
export rip-policy;
neighbor em1.0;
neighbor em2.0;
}

--
cuong@Jun3# set authentication-type md5

[edit protocols rip]
cuong@Jun3# set authentication-key juniper

[edit protocols rip]
cuong@Jun3# show
authentication-type md5;
authentication-key "$9$0DAq1EyM87s2alK2aZU.mO1R"; ## SECRET-DATA
group rip-group {
export rip-policy;
neighbor em1.0;
neighbor lo0.0;
}